While Statements
The while statement, like a for statement, repeats a number of times executing the code inside the statement each time. However, whilst for statements repeat for a set number of times (iterations), while statements repeat as long as the boolean condition is true – the loops exits when the condition is false. In this respect, a while statement is like an if statement that is repeated until the condition is no longer true
To demonstrate while statements in Processing, we will use the point() function inside the draw() method to create dots on the screen. The point() function simply draws a one-pixel point at the coordinates given as arguments to the function in the form
point(x, y);
where x is the number of pixels along the horizontal axis and y is the number of pixels down the vertical axis. So, for example, the function call
point(10, 20);
will draw a point at the coordinate (10, 20) which is 10 pixels from the left of the window, and 20 pixels from the top. In order to see what the code is doing, we will also use the print() and println() functions to display the location of each point by printing the coordinates to the console (the only difference between these 2 is that println() creates a new line). So, for example
println("point: " + 10);
results in the console output:

Figure 1: Console output
A simple example of a while statement, shown below, might simply loop until the value of a variable reaches a certain value, in this case 19 (as we are using < 20)
// set the current point as the start point
        int i = 0;
        // while i is less than 20
        while (i < 20) {
            // output the value of i
            println(i);
            //add 1 to i
            i++;
        }
Of course, this isn't a very interesting use of Processing, so a slightly more complicated while statement, shown below, will print a line of dots, using the point() function, and also output the coordinates of the dots so we can see what it is doing
        // set the current point as the start point
        int currentPoint = 0;
        // while the current point is less than the end point
        while (currentPoint < width) {
            // draw a single pixel point at that point, 20 pixels down
            point(currentPoint, 20);
            println("point:" + currentPoint);
            // increment by 5 to leave a gap
            currentPoint +=5;
        }
This will produce the output below – a screen with a lot of dots across it.

Figure 2: Points on the screen
If we converted this into an if statement, rather than a while statement, you will be able to see the difference
        // set the current point as the start point
        int currentPoint = 0;
        // if the current point is less than the end point
        if (currentPoint < width) {
            // draw a single pixel point at that point, 20 pixels down
            point(currentPoint, 20);
            println("point:" + currentPoint);
            // increment by 5 to leave a gap
            currentPoint +=5;
        }
Although it is quite hard to see, in the screenshot below you should be able to see a single dot on the left. The if statement has only created one dot, whereas the while statement kept creating dots until it's condition (currentPoint < width) was false i.e. when currentPoint reaches the width of the window

Figure 3: Single point on the screen
Exit condition
The loop will exit at the point that the condition is checked and found to be false, not at the point that the condition becomes false. Therefore the remainder of the loop iteration will complete and the loop will exit when the condition is evaluated. An analogy for this is a runner having to complete the lap, even though someone has won
        // set the current point as the start point
        int currentPoint = 0;
        // while the current point is less than the end point
        while (currentPoint < width) {
            // draw a single pixel point at that point, 20 pixels down
            point(currentPoint, 20);
            print("point:" + currentPoint);
            // increment by 5 to leave a gap
            currentPoint +=5;
            // draw another point at coordinates (currentPoint, 40)
            point(currentPoint, 40);
            println(" after");
        }
In the above example, the loop iteration continues even though the value of currentPoint is no longer less-than width. The point is still drawn and the 'after' output is still printed to the console because that iteration still completes before the while statement exits when the condition is re-evaluated.
Using Arrays
In the above examples, we specify the gap between the points by incrementing the currentPoint variable (the x-axis coordinate) by a set value of 5. What if, though, we wanted to vary the gap between each point by an arbitrary value by specifying the x-axis coordinate of each point? This would be possible using the above examples, but the resulting code would be untidy and overly-complicated
A common use for while statements is to access elements in an array. As the body of the statement will be executed multiple times, it can be used to access each element of the array in turn, ending when the last element is reached. This provides a convenient method of accessing every element in the array. Using an array, we can change our point program to specify the x-axis position of the points
        int i = 0;
        // specify the x-axis coordinates
         int[] array = {11,23,35,47,59,67,75,83,91};
        // loop over the array
        while (i < array.length) {
            point(array[i], 20);
            i++;
        }
Using a counter, each element in the array can be accessed in turn and the value given as the x-axis coordinate to the point function. The result is shown in the screenshot below

Figure 4: Variable points using an array
Compare to for loop
You may be wondering at this point why there is a need for a for statement if a while statement can do the same thing. If they seem similar it is because they are – a for statement provides a simple way of using a counter to define the number of times the statement loops. This means that the number of times the statement runs is known. Although a while statement can use a counter, as in the above examples, this need not be (and often isn't) the case. While statements with counters tend not to look as neat as for statements. For instance, the example above using a for statement would look like:
        // specify the x-axis coordinates
        int[] array = {11,23,35,47,59,67,75,83,91};
        // loop over the array
        for(int i = 0; i < array.length; i++) {
            point(array[i], 20);
        }
The main difference, however, lies in how you know when to exit the loop. The condition for exiting a while statement is not usually as straightforward – it is likely that you will not know exactly how many times it will loop when you write it, as the value of the condition will be determined while the program is running. It is also important to remember that it is possible (and a very common error) to accidentally write a while statement that will loop forever – an infinite loop – because the condition never becomes false
        int i = 0;
        // specify the x-axis coordinates
        int[] array = {11,23,35,47,59,67,75,83,91};
        // loop over the array
        while (i < array.length) {
            point(array[i], 20);
       // remove the i++ so it loops forever
       println(i);
        }
In the above example, the while statement loops forever because we never increment the value of i and so the condition will forever be true. If you run this, you will see the value of i being printed on the console, but you won't see the points on the screen because the draw method will never end. If you do run this, you can stop the program by closing the Processing window
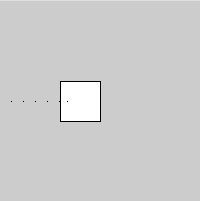
It is therefore necessary to have a well-defined condition that you know will exit at some point. A badly designed condition can result in an infinite loop that you didn't intend. This time we will create a 'target' square, and draw points until one of them lands in the target square, or we 'run out' of points. We will need to make sure that we know to exit the loop
        int i = 0;
        int yPoint = 100;
        int[] array = {11,23,35,47,59,67,75,83,91};
        // draw the target square
        rect(60, 80, 40, 40);
        boolean keepLooping = true;
        // loop until told not to
        while (keepLooping && i < array.length) {
            // draw the point
            point(array[i], yPoint);
            // if the point is in the square
            if (array[i] >= 60 && array[i] <= 100) {
                if (yPoint >= 80 && yPoint <= 120) {
                    // stop looping
                    keepLooping = false;
                }
            }
            i++;
        }
In this example, we exit the while statement when a point lands in the square by checking the location of the point to see if it falls within the region the square occupies, or if the variable i reaches the end of the array. This ensures we never try to access an element beyond the size of the array. The screenshot below shows what happens when we run this – the loop ends before the end of the array is reached because a point lands in the target square

Figure 5: Points hitting the square target
There are various ways of using the condition to determine how many times the statement will execute. Any statement can be used as the condition provided it evaluates or returns a boolean value. This could be:
- a counter that is tested in the condition (like an if statement)
- a variable that is tested for some criteria
- a boolean that is set it to false to exit
- a method that returns a boolean
do.. while statements
Just as it is possible to have a while statement that loops forever, it is also possible to have one that never executes if the condition is never met. If the condition never evaluates to true, the loop body will never be executed. However, sometimes you might always want a section of code to be executed even if the condition is not met. An example of this is requesting input from the user until they enter an exit character – you would always want to request the input, even if they enter the exit character first time. Using a while statement, the request code to be executed would have to be repeated. For example
 request input from user
 while (input is not a *)
  do something
  request input from the user
In this situation, there is another type of loop statement that can be used – a do..while statement. A do..while statement is like a while statement but evaluates the condition after the body of the loop has been executed. This means that the code inside the body is always executed at least once – if the condition is found to be false, the loop will exit at that point having already executed the code. For instance
 do
  request input from user
  do something
 while (input is not a *)
To demonstrate this, we can use the previous example, but set the keepLooping variable to false. Using a while statement, this would prevent the statement code from being executed. Using a do..while statement, however, the statement will run once, displaying a single point, before the condition is found to be false.
        int i = 0;
        int yPoint = 100;
        int[] array = {11,23,35,47,59,67,75,83,91};
        // draw the target square
        rect(60, 80, 40, 40);
        boolean keepLooping = false;

        do {
            // draw the point
            point(array[i], yPoint);
            // if the point is in the square
            if (array[i] >= 60 && array[i] <= 100) {
                if (yPoint >= 80 && yPoint <= 120) {
                    // stop looping
                    keepLooping = false;
                }
            }
            i++;
        } while (keepLooping && i < array.length);
It can be dangerous to always execute the code inside the loop statement if you do not know what the effect of that would be. If we didn't use the keepLooping variable, and the array was empty, accessing the element at array[i] would cause an ArrayIndexOutOfBoundsException. Using a while statement, the loop body would never be executed, so no exception would occur.
If there is a chance that the code should never be executed, then a while statement would be more appropriate. Do .. while statements should only be used when you know that need the loop code to be executed as least once. As such, they are seldom used, but do provide a useful way of eliminating duplicate code.
Putting it all together – TV static
To put together what you have learned so far, we will write a program using while statements that recreates television static. To do this, we will create an array of colours for the dots we will display, and use the random() function in Processing to randomise the colours we create. Processing also gives us access to every pixel on the screen using the pixels variable. We can use this to set the colour of each pixel by looping over the pixels array and setting the colour, which we will also randomise. This will give us a random colour for each point on the screen.
    private int[] colours;

    void setup() {
      // set the window size
      size(500,500);
      colours = new int[10];
      // load random colours
      int i = 0;
      while(i < colours.length) {
          colours[i] = color((int) random(0, 256), (int) random(0, 256), (int) random(0, 256));
          i++;
      }
    }

    void draw() {

        loadPixels();
        // change every pixel every time
        int i = 0;
        while(i < pixels.length) {
            pixels[i] = colours[(int)random(0, colours.length)];
            i++;
        }
        updatePixels();
    }
This gives us the TV static-effect shown below

Figure 6: Ten-colour TV static
Of course, the colours you generate may well be different due to the random colours we created. You can change the number of colours generated by simply changing the size of the colours array. For example, changing it to 2 gives the effect

Figure 7: Two-colour TV static

No comments:
Post a Comment